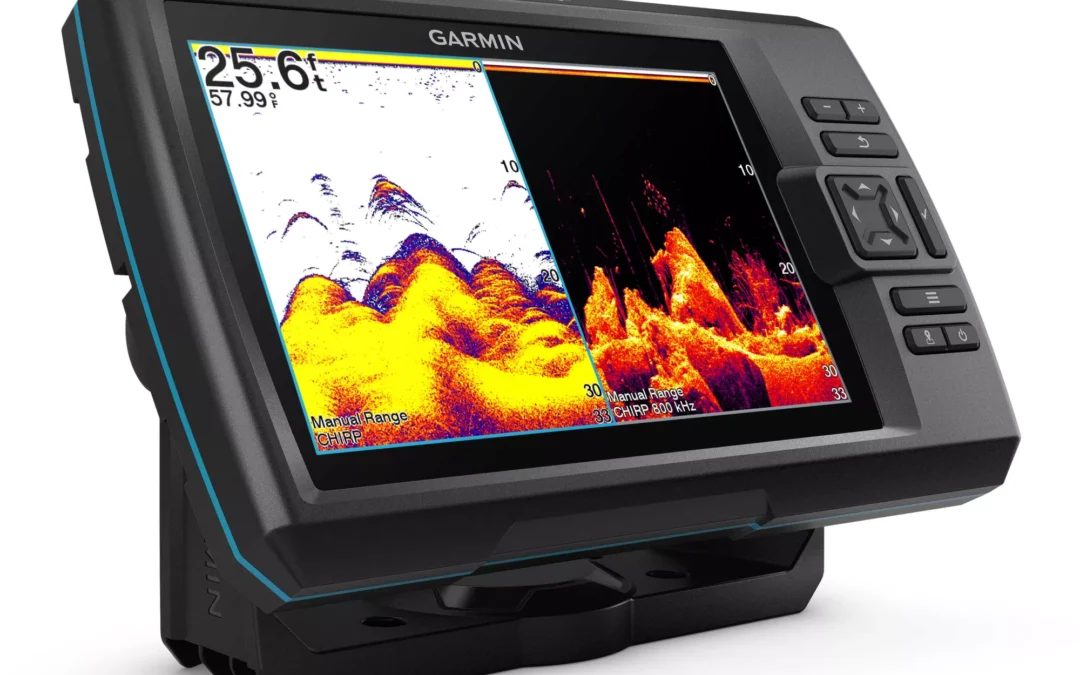
The Garmin Striker Vivid 7 CV is a fantastic fishfinder that has made a significant difference in my fishing trips. The unit is well-designed and easy to use, with a bright and clear display that provides detailed images of what’s happening below the water.
One of the standout features of this fishfinder is its CHIRP sonar technology, which delivers incredibly clear and detailed images of the fish and structures beneath the water’s surface. It’s easy to distinguish between different fish species and to locate schools of fish quickly, even in deeper waters.
Another thing I appreciate about the Garmin Striker Vivid 7 CV is its GPS capabilities. The unit provides accurate and up-to-date information on water depth, temperature, and speed, which has helped me make more informed decisions about where to cast my line. The GPS also allows for easy navigation and marking of waypoints, making it simple to return to successful fishing spots in the future.
The unit is easy to install, with a straightforward interface that’s intuitive to navigate. The touchscreen is responsive and user-friendly, and the unit is compatible with a range of transducers and other accessories, allowing for customization to suit individual fishing needs.
Overall, I highly recommend the Garmin Striker Vivid 7 CV to any angler looking for a high-quality fishfinder. Its CHIRP sonar technology, GPS capabilities, and user-friendly design make it a valuable tool for any fishing trip, and the unit’s durability and reliability make it an excellent investment for years to come.
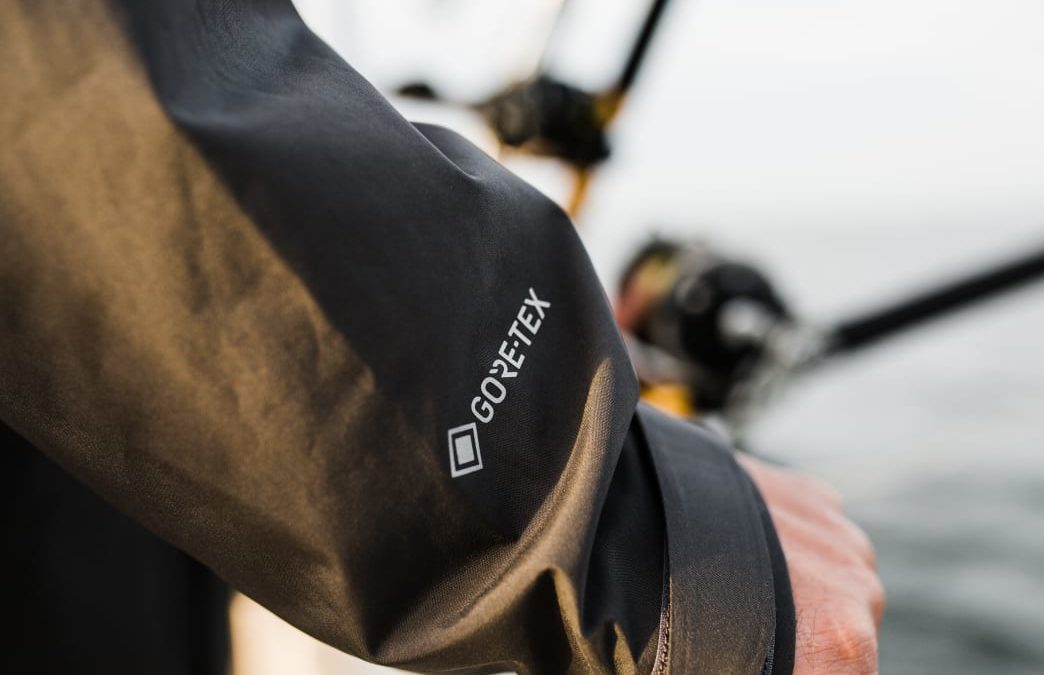
Learn how to maintain your waterproof clothing so it keeps you warm and dry every season
The weather forecast called for sunny skies a high of 83 degrees. Instead, it’s minus-25 and starting to snow, and the wind-chill factor is enough to make a longshoreman blush. Underneath my rain suit, I’m dressed in a t-shirt and jeans. Without base-layers or insulation, I’ll be dead—frozen solid—in a couple of hours.
Fortunately, only a step away there is a warm and dry place where I can retreat—because while these ice-cold conditions are harsh, they’re only a simulation. I’m at the Gore headquarters in Delaware. More specifically, I’m inside the Environmental Chamber of the company’s biophysics lab, where Gore tests all of their gear by subjecting it to extreme temperatures (-58 to 122 degrees), simulated rain showers, UV-light damage, and other environmental stressors. Another way to put it: This is where Gore puts every new Gore-Tex product through their own version of hell. They burn gear, freeze it, stretch it, grind it, and expose it to things like saltwater, gasoline, and human sweat—then they rinse it off and do the tests all over again. Grundens is collaborating with Gore this year to bring out an awesome new line of fishing bibs and jackets. They invited us to test out the new gear, and to see how Gore-Tex is made.
If you hunt or fish, chances are, at least once in your life, you’ve gotten soaking wet—and were so miserable that you probably wondered, briefly, why you bother spending time in the outdoors. Good, dependable rain gearand waterproof boots are things we learn to appreciate the hard way.
When it comes to waterproof gear, it’s hard to beat Gore-tex. And even though I have been using Gore-Tex gear for years, I never appreciated just how innovative, and durable, this clothing was before my trip to Gore HQ. I also didn’t realize how simple it is to clean and maintain my waterproof gear and keep it working properly for years to come.
Captain Wild Bill Wichrowski and angler Claus Claesson trying to stay warm in the Environmental Chamber. Grundens
How Is Gore-Tex Made?
Gore-Tex, and the material it is made from, actually come from a rock—or rather a mineral called fluorspar. It gets ground to a powder, baked into a soft doughy polymer, and then stretched into fabric. This fabric is called ePTFE (or expanded PTFE), and it’s a lot like the Teflon plumbers tape (used for sealing the threads on pipe) that’s commonly found at the hardware store.
Gore took ePTFE and explored possibilities for any application they could think of. It became a launchpad for many products, including life-saving medical devices and the membrane found in Gore-Tex jackets, pants, bivy bags, and more. The ePTFE was perfect for clothing because it could keep water and wind out while still allowing air to escape through microscopic pores.
Gore-Tex is made from the mineral fluorspar. Alusruvi / Pixabay
Our bodies can produce up to 1 liter of sweat per hour and the tiny holes in a Gore-Tex membrane allow sweat to evaporate and escape. At the same time, they are too small for larger water molecules or wind to pass through. What you get is a waterproof, windproof membrane that breathes and adjusts to your body’s fluctuating temperature.
The membrane isn’t strong enough to hold up to the constant wear and tear that a piece of clothing experiences, so Gore laminates it onto different kinds of fabric for warmth and support. The fabric then gets another waterproof coating on the outside called Durable Water Repellent (DWR), and every seam–where a needle and thread punches through–gets glued and taped. Gore-Tex needs to be sewn and taped in a specific way, and Gore inspects every facility that does this.
Is it OK to Wash Gore-Tex Clothing?
After our spin in the gear torture-chamber, we all took off our rain gear and headed upstairs to a room that was remarkably less high-tech than the Environmental Chamber—but still sort of unbelievable: a room filled with 200 washing machines. I’m not exactly sure why, but I never thought you were supposed to wash Gore-Tex. I just assumed that running the clothes through a washer would destroy the waterproofing, so I have never cleaned any of my Gore-Tex gear.
Some new Grundens rain gear holding up to a heavy downpour in the Gore-Tex Rain Room. Grundens
Turns out, I wasn’t alone here. The folks at Gore told us that many people aren’t aware that washing Gore-Tex is actually good for the gear. When it gets dirty, the microscopic pores that are so important for breathability get clogged, and the garment no longer performs to its full potential. The easy fix—and one that is often overlooked—is simply to wash it and unclog the pores. The DWR coating is also available in many stores and online, and with a wash and a new application, your Gore-Tex will be ready for more gale-force winds and whatever else the Mother Nature throws at you.
Imagine my delight when I realized that all of my smelly, mud-encrusted hunting gear, crammed in tote boxes in my basement, could be washed—and worn in public again.
You could wait until your Gore-Tex is as dirty as mine (and by that, I mean dirty enough to walk out the door and go hunting all by itself), or you could look for a couple of telltale signs that your gear is ready to be washed: If water stops beading up on the outside and starts soaking into the fabric… If dirt is ground into high-wear areas like the cuffs and elbows… If sweat has discolored any part of the garment… These are all good indicators that it’s time to pick up some extra DWR, and give your gear a good wash per the instructions below.
How to Clean Gore-Tex at Home in a Washing Machine
Step 1: Use one capful of liquid detergent and set the machine to warm permanent press cycle (105 degrees F/40 degrees C). Make sure not to use any powder detergent, fabric softener, or bleach.
Step 2: Check the pockets on your Gore-Tex gear before zipping them all shut along with any other zipper on the garment. Add the garment and select the low-spin option, then wash. Rinse twice before hanging it to dry.
Step 4: Once the garment is dry, put it in the dryer for 20 minutes to reactivate and condition the DWR. If a dryer isn’t available, iron the garment on a warm, gentle setting without steam, and make sure to use a towel between the garment and the iron.
Step 5: Apply a DWR spray repellent or a DWR wash-in solution and tumble-dry again for 20 minutes on low.
Written by Matthew Every for Field & Stream and legally licensed through the Matcha publisher network. Please direct all licensing questions to legal@getmatcha.com.
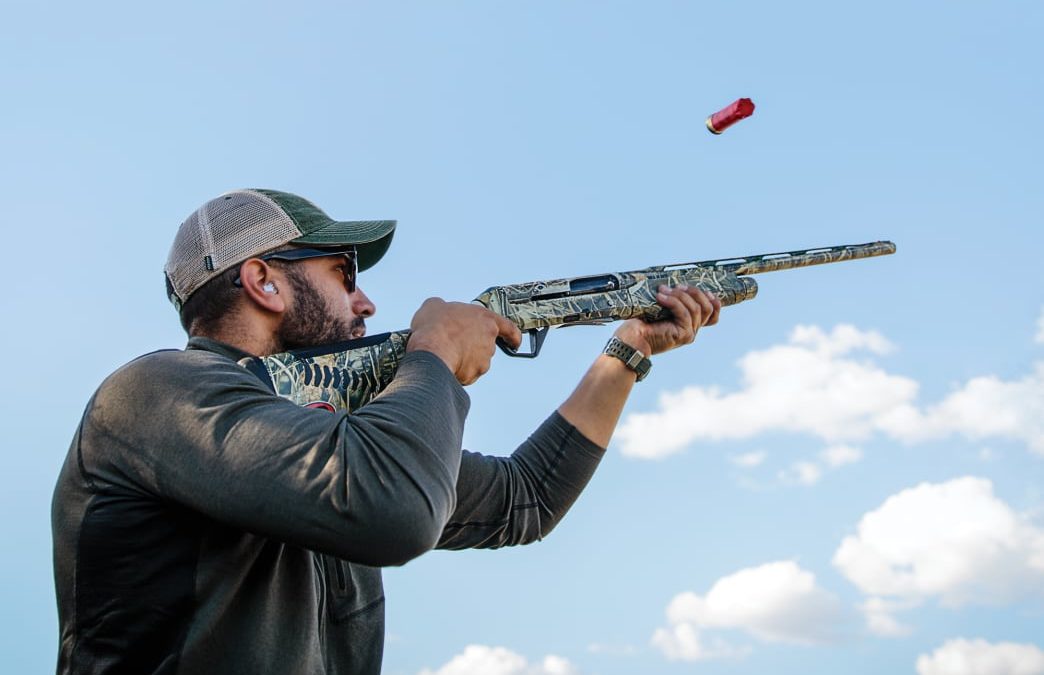
How plastic shims can fine-tune your gun—and make you a better shot
The 98 cents’ worth of plastic shims that came with your new $1,800 semiauto might be the most important part of the whole shotgun. Stock shims let you fine-tune cast and drop to get a perfect fit—and make your new gun almost a part of you. This is a big deal. Before shims, altering a wood stock involved a gunsmith and real money, and changing the dimensions on synthetic stocks was pretty much impossible.
Now, many shotguns come with shims, including such affordable standards as the SuperNova pump and the Mossberg 930. No longer is the off-the-rack shotgun a one-size-fits-all proposition. That little bag of plastic shims can make you a much better shot, if you know how to use what’s inside.
Mount Up
The first thing to do with your shim kit is…nothing. Put it someplace where you will not lose it, and start with an honest appraisal of your gun mount. If you practice it on a regular basis and are already dialed in, you can skip this step. Otherwise—and here I am talking to the vast majority of you—listen up.
Your head is the rear sight of the shotgun, but think of it as a scope for a moment: There’s no point in sighting in a gun if the mounts and rings are loose and the scope wiggles. Likewise, if your head doesn’t meet the stock consistently, your point of impact will wander and gun fit becomes a moving target. You need to crank down the screws. With a real scope, you use a Torx wrench. With a shotgun, you practice your gun mount until the “sight” (your head) comes to the same place on the stock every time.
I’ve written ad nauseam about how to mount a shotgun correctly, but it really matters, so let’s review: Practice at home by first checking and then double-checking that your gun is unloaded. Pick a spot on an opposite wall, fix your eyes on it, and bring the gun up so that the muzzle points to the spot without your looking at the bead. Do this by pushing the muzzle toward the target while raising the stock smoothly to your face first, not your shoulder. Don’t crush your head into the stock, because you won’t do that in the field. If you practice this drill with a Mini Maglite AA in the muzzle, the beam will tell you if the gun is pointing where it’s supposed to. You can also check your work in a mirror. When you mount the gun on your reflection, you should see your eye centered over the rib. Do that for 10 to 15 minutes a night for a couple of weeks.
Drop shim shotgun illustration Robert L. PrinceCast shim shotgun illustration Robert L. Prince
Dial In
Once you are mounting your gun consistently, take it to the range and shoot “groups” with a tight choke while standing 16 yards from the target. Use paper, a steel pattern plate (no steel ammo with steel plates, though) if you have access to one, or a hanging bedsheet with a mark painted on it. Mount the gun, neither rushing nor aiming, and shoot at the mark. Don’t correct if you’re off target. You’re trying to shoot a good group, not hit the bull’s-eye.
If you hit the same place every time, you’re ready to consider shims. (If you don’t, keep on practicing your gun mount.) Look at the center of your group. If it’s on or less than 2 inches off the mark, you’re probably good (depending on where you want your point of aim to be; see below). Otherwise, for every 2 inches off, you need a 1⁄8-inch adjustment to the stock in the appropriate direction.
The shims go where the buttstock meets the receiver, so you’ll need a Phillips screwdriver to remove the pad, and a long flat-head screwdriver or extended socket wrench to take off the stock. (Some kits also include a plate that goes over the stock bolt after you put the stock back on.)
If you want the gun to shoot higher, use a shim that gives you less drop; in the case of Italian shims, it’s a lower number of millimeters. With U.S. shims, it’s usually something like +1/8. (Check the manual.) To lower your point of impact, which is the most common adjustment, use one with a greater number of millimeters or –1/8. Move the pattern right with cast off, left with cast on. Italian shims are marked D for destra (“right” for cast off) and S for sinistra (“left” for cast on, or “evil,” which is completely unfair to us left-handers). Repeat the pattern process and change out shims as necessary until you’re satisfied. When that’s done, I like to go to station 7 on the skeet field and shoot low-house outgoers with a low-gun start to be sure the gun hits where I’m looking.
Where you set your point of impact is up to you. Most hunters and many sporting-clays shooters prefer a gun that centers the pattern on the point of aim, giving a 50/50 pattern that prints half above and half below the aiming mark, and a sight picture that’s flat along the rib. Some upland hunters and target shooters prefer to “float” the bird over the barrel, and therefore like a gun that shoots a little high—about 55/45—and lets them see a little bit of rib. Trapshooters like guns that shoot 60/40 or even higher. However you prefer to shim your stock, you’ll have made it a perfect fit for you, and that’s time and 98 cents very well spent.
GEAR TIP: Beware the Floating Gun Case
Floating gun cases have become standard equipment among waterfowlers and many other hunters. They’re convenient and offer peace of mind should the boat swamp. But they have one huge drawback: They don’t breathe. If you put a damp waterfowl gun in a floating case after your hunt, it might be orange with rust by the time you get home a couple of hours later. It has happened to me. Take the time to wipe your gun down with an oiled cloth before you put it back in the case. By the way, the best method for drying the inside of a floating case is to stick it on a boot dryer.
Written by Phil Bourjaily for Field & Stream and legally licensed through the Matcha publisher network. Please direct all licensing questions to legal@getmatcha.com.
We’ve always been a fan of YETI products and the first thing you see when this pack arrives is its durability. This pack has been floating around the back of a small Cessna, bottom of a boat, back of a pick-up and quite honestly dragged through the dessert more than once. When all was said and done the “Stand-up Construction” still stood up.
In part because of the shell which includes a water-repellant coating, a PU-backed 1000D nylon face, and 210D ripstop backer. Which means its rugged and will stand up to some of the harshest critics when it comes to durability.
The second standing point for this pack is its functionality. We like simple and the multi-use functionality easily allowed us to go from board room to back woods without skipping a beat. Fly Fishing gear, sunglasses, and even a shelter for your laptop if for some reason work comes calling during the pursuit.
Our one gripe was size, at times it did seem overkill for the short-trip but the side handle is key when needing to carry it more like a brief case or duffle than a pack.
With it all said and done this pack withstood the test of time and its two main features speak loudly, durable and functional. What more could you want in a pack.
How to catch more walleyes, bass, pike, and muskies on spinner rigs and bucktails
Why do blades adorn so many different lures designed to catch so many different types of fish? Three reasons: flash, vibration, and sound. It doesn’t matter if it’s the tiny teardrop of a walleye spinner or the massive bangle on a muskie bucktail, blades of all shapes and sizes send thumping underwater signals that make big fish hit. All kinds of big fish. Spinnerbaits win bucketmouth tournaments and pull monster pike from northern bays. Bucktails catch more muskies than every other lure combined. Spinner rigs are the classic choice for trophy walleyes, and blade baits dupe the biggest smallies.
While blades work year-round, their ability to draw reaction strikes in the spring is unmatched. With northern lakes just past ice-out and southern ones yet to warm, lethargic fish can be incredibly difficult to catch. They need something to wake them up, get their attention—even piss them off a little. And nothing agitates big spring fish more than a vibrating, flashing, annoying piece of spinning metal. With so many ways to run so many different bladed lures, we asked four of the country’s top trophy-fish hunters to reveal their No. 1 spring blade tactic. Here are their secrets.
Northern Pike: Roll the Cabbage
Steve Scepaniak pike fishing guide Steve Scepaniak
The Expert: Steve Scepaniak, pike and muskie guide Home Base: Lake Mille Lacs, Wahkon, Minn. Contact:Predator Guide Service
Go-To Lure: Ruff Tackle Rad Dog Spinnerbait
Lake Mille Lacs is renowned for its toothy predators, and while longtime area guide Steve Scepaniak focuses mainly on the lake’s muskies in summer and fall, he turns his full attention to huge pike early in the season. “There’s no better time to score a giant than in the spring,” he says.
And there’s no better lure to catch them with than a big spinnerbait. “Of the 700 or 800 pike over 40 inches I’ve had in my boat, I’d say three-quarters of them have come on spinnerbaits.” For every one of those spring spinnerbait fish, the lure was allowed to sink in the water column for a few seconds before the retrieve. “This is the most important detail for catching pike now,” Scepaniak says. Other times of year, a fish may come up to grab a lure, but not in the spring. “Getting it down to them is the key.”
By now, pike are done spawning, but they haven’t left the shallows. “In April and May, large post-spawn females will hang in back bays before moving out as the water warms,” says Scepaniak, who starts targeting these fish when water temps are in the low 60s. “The first thing you have to do is find the cabbage,” he stresses. Keep your boat around 12 feet deep, and look for the vegetation in 4 to 6 feet of water. Almost any cabbage bed will hold at least some pike in the spring, for a couple of reasons. “First, the structure of cabbage provides optimal ambush sites for pike,” he explains. “Second, the broad leaves of cabbage produce lots of oxygen, which attracts zooplankton and phytoplankton, which attract baitfish, which then attract northerns.” Scepaniak works large spinnerbaits low and slow in the water column to ply the deeper cabbage leaves. “Run it just fast enough so that the blades are barely spinning—no faster,” he says. The lure only needs to give off a little vibration. “The pike will home in on that, and eat.”
Rough Tackle rad dog lure Ralph Smith
Pro Tip: Switch Blades
Scepaniak uses a number of commercially made spinnerbaits at this time of year, but every one of them, including his favorite Rad Dog, gets one mandatory alteration. “I switch out every blade on every spinnerbait to a No. 8 Colorado,” he says. “The immense vibration of that big round blade is essential to catching big pike.” Most pike and muskie spinnerbaits have a small split ring where the blade is attached, making it easy to change them out. “All it takes is some spare No. 8 Colorados and some split-ring pliers to get more vibration—and catch more fish.”
Muskies: Burn a Buck
Mike Hubert muskie fishing guide Mike Hubert
The Expert: Mike Hulbert, muskie guide Home Base: Lake St. Clair, Roseville, Mich. Contact:Mike Hulbert
Go-To Lure: Joe Bucher 700 Series Bucktail
Running bucktails for muskies often involves huge, double No. 10 Colorado blades. But not at this time of year, says Mike “MJ” Hulbert, who’s known for boating trophy muskies. “In spring, I throw small, weighted bucktails at stupid warp speed to get reaction strikes from fish that aren’t yet fired up,” he says.
Regardless of where you are, muskies will spawn in the weeks after ice-out in back bays and shallow flats—and that’s where they’ll stay for a while, recuperating in a lethargic post-spawn phase. “I try to pick them off before they head back out to open water,” Hulbert says. “I focus on rocks, riprap, and newly emergent green weeds in 3 to 6 feet of water.” Weather can be a huge factor too. “I’ll start targeting these fish when the water creeps into the 60s, but I also pay particular attention to warming trends, when the water may spike a few degrees,” he says. Southwest winds and rising humidity usually mean better action too.
No matter what the conditions, the real key lies in getting these torpid, zoned-out, post-spawn giants to wake up and react. That’s where burning small bucktails comes in—but there’s a trick. In order to achieve warp speeds while still keeping these relatively light baits under the surface, Hulbert puts some weight on. “No factory bucktail is heavy enough for this application,” he says. “If you’re a tinkerer, you can cut the shaft of the bucktail, slip on a 3⁄4-ounce egg sinker, and retwist.” If not, just attach a 3⁄4-ounce bell-shaped bass-casting sinker with a small split ring, placing it near the skirt where it won’t impede the blade action or hookup ratio.
Butchertail bladed lure Ralph Smith
As a side benefit, that extra weight greatly improves casting distance. Covering a ton of water is key to this tactic, so making bomb casts is a must. Or as Hulbert puts it: “The one who casts the farthest is the one who gets bit.”
Walleye fishing spinner bait with crawler Bill Lindner
Walleyes: Spin the Spawn
Ross Robertson walleye guide Ross Robertson
The Expert: Ross Robertson, walleye guide Home Base: Lake Erie, Toledo, Ohio Contact:Big Water Fishing
Go-To Lure: Silver Streak Crawler Harness
Lake Erie is synonymous with donkey walleyes, and no one is better at catching them than guide Ross Robertson. “In April and May, I’m buying nightcrawlers and fishing spinner rigs,” he says. “Crankbaits can smoke fish under certain conditions, but trolling a spinner rig gives me the versatility to catch fish all day during various stages of the spawn.” The spinner’s blades get a walleye’s attention, but even if that fish is finicky, the scent of live bait combined with a slow presentation often seals the deal. “The crawler is the closer,” says Robertson.
On big lakes, he targets walleyes that spawn near the main reefs. On smaller lakes and rivers, he keys on tributaries and smaller reef structures. In both areas, fish will trade to and from the spawning ground, and Robertson nabs them on the move. “I focus on the first transition to deeper water,” he says. “In this zone, fish can be anywhere from 12 to 40 feet deep, so it’s important to use your electronics to pinpoint fish.”
Walleyes are slow-moving now and often glued to the mud. “Spinner rigs can be trolled on or just off the bottom to reach them,” Robertson says. “The key is to make very subtle changes in boat speed to vary the depth and get your rig where the fish are.” Speeding up or slowing down even 0.1 mph can have a huge impact. “As a rule, 1 mph is a good place to hover,” he says. Then just add or subtract. But not too much: “At any speed lower than 0.7 mph, the blades stop spinning; faster than 1.4 mph, and the rig lifts too high off the bottom.” The trick is to find the sweet spot. You’ll know when you get it right, Robertson says, because you’ll start slamming walleyes.
Pro Tip: D.I.Y. Spinner Rig
For over-the-counter spinner rigs, Robertson likes the Silver Streak Crawler Harness, but for optimum success, he suggests that you take the time to make your own. “I start out with 20-pound Sunline fluorocarbon because it’s durable and stiff, which means fewer tangles, and because it runs better at slower speeds.” The most important element of the rig is a super-sharp hook, he says. “I go with a No. 2 Gamakatsu octopus for the front hook and a No. 8 round-bend Gamakatsu treble hook as the trailer.” For the hardware components, Robertson prefers Dutch Fork quick-change clevises and No. 5 Spro power swivels. “Finally, I get plenty of No. 5 and No. 6 Colorado blades and No. 8 Indiana blades in a large variety of colors and finishes so I’ve got plenty of options with my finished rigs.”
Bass fishing blade baits Lance Krueger
Bass: Be a Blade Runner
Dave Lefebre bass elite pro Russ Scalf
The Expert: Dave Lefebre, BASS Elite pro Home Base: Lake Erie, Erie, Pa. Contact:Dave Lefebre
Go-To Lure: Steel Shad Blade Bait
It’s not every day a BASS Elite angler shares his secrets, but longtime pro and Pennsylvania native Dave Lefebre told us that he’s been using blade baits in the early season on the sly for years—and that he’s zeroed in on a spring pattern that slams trophy bass during their spawning transition. Throughout most of the country, both largemouth and smallmouth bass are in some phase of the spawn in April and May, but their exact location and activity level varies. “You can’t pick a more complicated two months to fish,” says Lefebre. You need a versatile lure to score. “My go-to now is a Steel Shad blade bait in any natural baitfish color.”
When targeting smallmouths, he looks for steep breaks adjacent to spawning flats. “Any irregular features such as small points or humps will sweeten the spot.” Early in the spring, he pinpoints fish on these deeper structures with his graph, and then vertically jigs the bait right under the boat. As the spawn progresses, he moves up onto the spawning flats and makes long casts with the same bait to cover lots of water quickly. “I use a fast, straight-line retrieve to pull reaction strikes.”
Steel shad fishing lure Ralph Smith
For largemouths, Lefebre focuses on structure in 2 to 5 feet of water. “Old dead grass from the year before or new emergent grass will attract spawning fish,” he says. He starts with the deepest grass first, focusing on any irregularities. As the water warms, he again moves up and dissects the flats, looking for holes, sand, and grassbeds. His approach here is similar to that of working a bass jig. “I pitch the blade out to the target, let it fall to the bottom, snap it up a few times, and repeat,” he says. If the bait catches grass, give it a sharp pop to clear the hooks and continue your retrieve.
Bass are not actively feeding at this time of year, so the key is to goad them into striking. “Blades are the best reaction baits on the planet,” Lefebre says. Their ability to sink fast, produce high flash and vibration, and closely imitate a minnow are a proven combination for inactive fish. “You can fish a blade anytime of year, but it’s my deadliest bait in the spring.”
Pro Tip: Add and Subtract
Lefebre makes his blade baits even more effective on spring bass by making a pair of tweaks. First, he likes to introduce a little extra flash. “Models like the Steel Shad are available in a ton of different colors, but adding a bit of reflective tape is quick and easy—and it can make a huge difference,” he says. His second tweak is to remove the front hook. “This is the one that snags most frequently. For covering a lot of water around docks, logs, and vegetation, having only a back hook makes life easier, and it doesn’t seem to affect my hookup ratio.”
Written by Mark Modoski for Field & Stream and legally licensed through the Matcha publisher network. Please direct all licensing questions to legal@getmatcha.com.